Navigating Ethereum — Part 3


January 25, 2021 -
After setting up Ethereum and configuring a private blockchain in Part 1and learning how to write some basic smart contract in Part 2. We now deploy the contracts we created earlier on our blockchain and build a web app to interact with the contract. The app sections require some working knowledge of React and functional programming in JS.
The complete code for the app and contracts is available from github here. The Truffle framework helps you manage lifecycle of Ethereum smart contracts in an elegant way. It compiles, deploys and version manages your stuff for you. Easily deploys to different networks (production, test, private) using just configurations. Best part is the ease of dApp (Distributed Apps) development. Of course it doesn’t hurt if you know how to do things without Truffle, but this is the easiest and fastest way to build dApps. So lets download a reusable React bundle and get started.
Create a directory called ‘mydApp’. From inside the directory run following commands
> npm install -g truffle> truffle unbox react
This downloads a ‘Truffle Box’ which contains all the boilerplate code required for interacting with smart contracts and firing up a React app. There are many other ‘boxes’ available at truffle site.
The next important tool we need to get this app working is MetaMask. Go ahead and install the plugin onto your browser. This is a wallet software which stores your accounts safely for you. Once installed we would need to do few configuration changes for it to connect to our local blockchain and use the accounts we created earlier. Click on the top left corner where it says ‘Main Network’ and select ‘Custom RPC’. In the text field enter “http://localhost:9090” and save. Now on the right hand corner click and select ‘Import Account’. For type select ‘JSON File’ and select the account id file of a user we created on blockchain. The file should be at “<chain-data-dir>/keystore”. You can import as many accounts as you wish.
Lets try to get the app started. Go to the home directory of your truffle app. Open the file called truffle.js in a text editor. And change it as below:
module.exports = {
networks: {
development: {
host: “localhost”,
port: 9090,
network_id: “15”, // Match our chain’s network id
from: ‘<MINER_ACCOUNT_ID>’
}
}
};
This configuration tells Truffle which network to deploy the smart contracts. You can have multiple sections under ‘networks’ to indicate testing, prod, etc. Update the miner address to the address of your first account. It could be any account on the chain you are deploying to, but for now we will use our miner’s account. Compile the code using:
> truffle compile
Next unlock the account we specified in truffle.js to deploy the contracts.
> personal.unlockAccount(‘<MINER_ACCOUNT_ID>’);
Make sure your blockchain node is running, also start the miner. And now deploy the contracts from truffle:
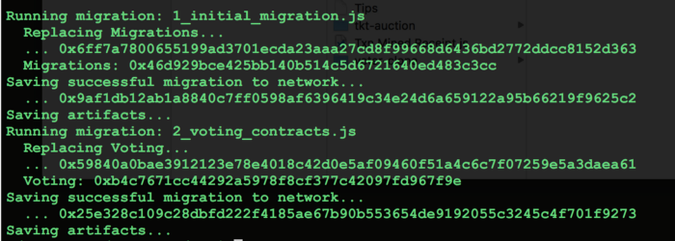
> truffle migrate
Let’s see what did we just did. We compiled the sample contracts which are part of the downloaded bundle. Then unlocked the account because we are going to deploy the contracts on blockchain. Deployment of code is also a transaction and it costs gas/money so we need to unlock the account which we use for deployment. If all goes fine then you will see some addresses and hashes for each of the contract after a few seconds.
Next we start the app.
> npm run start
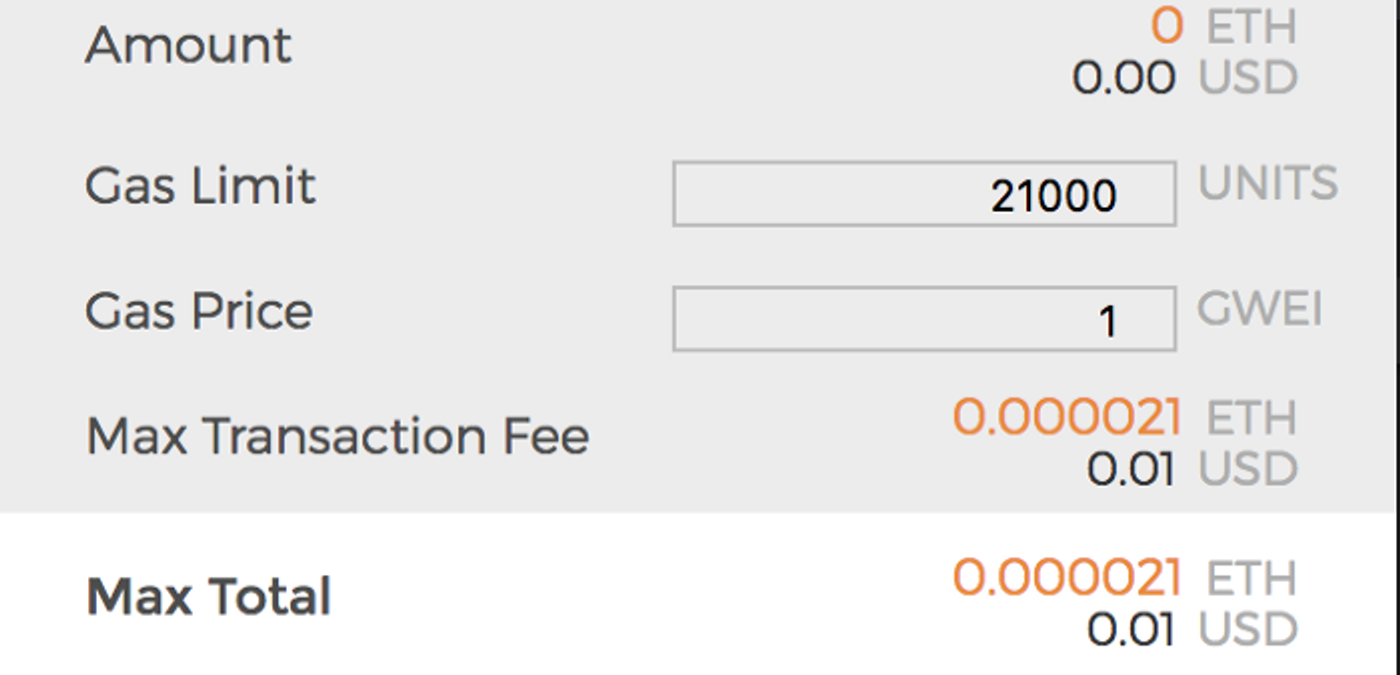
This will automatically open a new browser window for you at localhost:3000. And there will be a new kind of popup waiting for you to approve the transaction. Something like below:
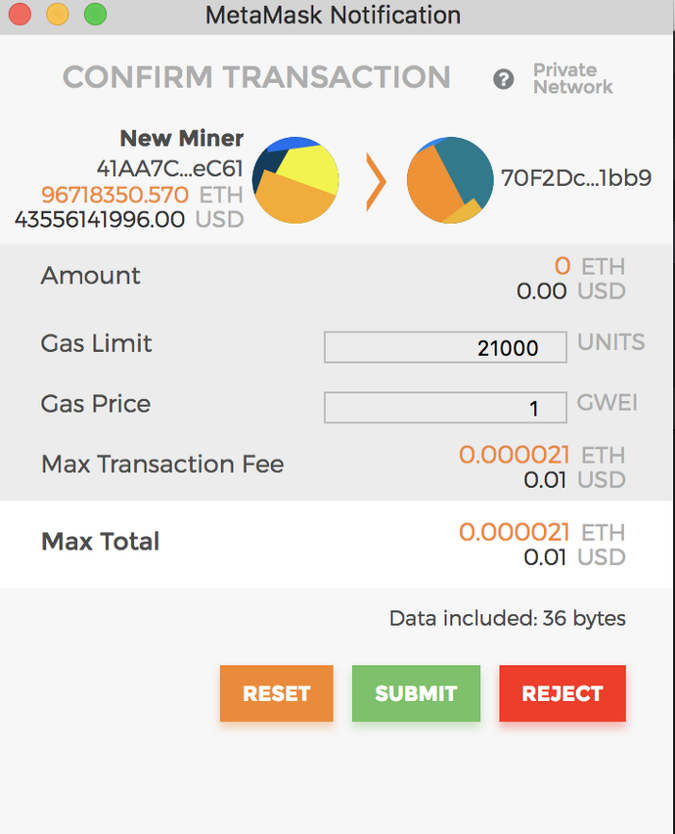
This is the magic of MetaMask that we installed earlier.
What is happening behind the scenes is that the web app that we started has connected with our blockchain using the account that we imported. And it is trying to send a transaction to the sample contract we just installed on blockchain. And as you would know by now any transaction costs gas/money and you being the wallet owner need to approve the transaction.
You need to understand that a lot of complexity and difficult concepts are involved in just running this simple app. So if it all feels weird for now, its ok. Just hang in there we will soon deploy our own contracts we created earlier and maybe that will clear out many things.
Once you click on the “Submit” button on MetaMask. The value at the end of the page should be updated to ‘5’ instead of 0, as shown in the message above it. The final screen should look like below:
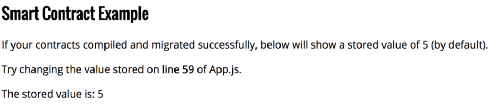
The output from sample code
To start deploying our code copy the contracts we wrote earlier in Remix IDE to the app under the ‘contracts’ folder as BallotData.sol and Voting.sol. Compile them using truffle compile. The next thing we do is use the feature of deployments and contract management as provided by Truffle. Go to the directory called ‘migrations’ at the root of the app. You will find 2 files there starting with 1_xxx and 2_xxx. Create a new file called “3_deploy_contract.js” and edit it to contain following:
var Voting = artifacts.require(“./Voting.sol”);
module.exports = function(deployer) {
deployer.deploy(Voting);
};
Notice that we have mentioned only one contract Voting. Since this extends/imports BallotData we do not need to deploy it separately. We could have also written them together into a single file. But keeping them separate is just a good coding practice — nothing to do with solidity! Ok now run “truffle migrate”. You will notice that it only deploys the voting contract and does not redeploy the older ones again. This is the advantage of truffle contract management. To see what all contracts are deployed where you can use
> truffle networks
Or to just force redeploy all contracts you can
> truffle migrate --reset
Now that our voting contract is deployed, we can start writing the code for interacting with it. Rename the existing App.js under ‘src’ folder to something else and create a new App.js file. Edit it with below code skeleton to start with
import React, { Component } from ‘react’;
import contract from ‘truffle-contract’;
import votingContract from ‘../build/contracts/Voting.json’;
import VoteOption from ‘./VoteOption.js’;
import Web3 from ‘web3’;
import ‘./css/pure-min.css’
import ‘./App.css’var voting = contract(votingContract);

var me = null;
var web3 = window.web3;

class App extends Component {

}
export default App;
Web3 is the client JS library provided by Ethereum to interact with deployed smart contracts. We import the compiled contract which is in json format (actually an ABI — Application Binary Interface) as ‘votingContract’ and initialize it using the ‘truffle-contract’ library. Things get hairy from here because you will see a lot of React code in the final version of this component. So to keep it simple I will describe the parts related to interacting with blockchain and leave the rest of React code for you to figure out :) Let’g go:
As I mentioned the web3 library is what helps us connect to our blockchain. But then that’s about it (at-least for the scope of this tutorial). For invoking contract methods we would be using the instance of contract binary we just created.
....
class App extends Component {
componentDidMount() {
web3 = new Web3(web3.currentProvider)
voting.setProvider(web3.currentProvider);
}
}
...
This is a standard React method, where we initialize our objects. We do that with the current web3 provider — or to put it simply a connection to our blockchain using the web3 instance provided as a global variable by MetaMask. Remember we had configured MetaMask to point to our node. Yup piece of cake!!!
We write a method to get the list of options from our contract.
initOptionList = () => {
var tmpNames = [];
voting.deployed().then(function(instance) {

});
}
The method looks up the deployed instance of the contract. Remember these are default methods and API provided by truffle contract for us. Next we get the number of options available for voting from our contract using ‘optionsCount’ which is an auto generated method for our variable because its public. Since the method in contract is a ‘read’ and does not modify state we would call it using ‘call()’. Lets update the above code
...
voting.deployed().then(function(instance) {
instance.optionsCount.call().then( function(optCount) {
});
});
...
The return value which is a “uintXX” returns a BigDecimal object in JS with multiple properties. We can use the “toString” to get the actual value as string. Things get interesting here when we lookup each of the options and store it in a local array:
...instance.optionsCount.call().then( function(optCount) {
for(let i = 0 ; i < optCount; i++) {
instance.getOptionAt.call(i).then(function(optInfo) {
tmpNames.push( i+ “,” + optInfo);
if(i == (optCount-1)){
me.setState({isOptData: true});
me.setState({optNames: tmpNames});
}
});
}
});...
The method “getOptionAt” returns two values, the name and the score of that option. So the return value is an array which we store as string for display later.
On any other language this would be a terrible approach. To call the server for each item in an array. Well Solidity does not return arrays of strings because string is also a bytes array. There are workarounds to this though. You can optimize this in different ways but for now we will live with this simple approach. The saving grace is that since its a read transaction you are not paying for it in gas.
Note: It will not be a good idea to use this approach in production
We would now create another method to add a new option to the list.
addOption = () => {
let currUser = window.web3.eth.defaultAccount;
let option = this.refs.optName.value;
try {
voting.deployed().then(function(instance) {
instance.addOption.sendTransaction(option, {gas:3000000,from: currUser}).then(function(txnHash) {
me.setState({txnId : “Transaction Id : “ + txnHash});
});
});
} catch (err) {
console.error(“Err loading options count “+ err);
//indicate this to user too
return;
}
}
This is similar to the other method barring the highlighted lines. To get the current selected account id from MetaMask we use the ‘web.eth.defaultAccount’. Adding a new Option results in new data being stored on blockchain and therefore is a transaction which is mined and costs money to the sender. So instead of ‘call()’ we need to use ‘sendTransaction’ with the amount of gas we are ready to spend on our data being stored. The return value is a transaction hash which we can look up from our block explorer. The hash does not indicate that the transaction is accepted or mined. It is just an id.
Note: Remember to start the miner from your console before you submit a transaction.
Sending too less gas will result in transaction never being mined. But if you pass more than required gas the unused gas balance will be refunded. Its very important you understand gas and its implications on transactions. Very good explanations given here
Another method would let a user vote for one of the options.
vote = () => {
let optId = this.state.selectedOpt;
let currUser = window.web3.eth.defaultAccount;
voting.deployed().then(function(instance) {
try {
instance.vote.sendTransaction(optId, {gas:3000000, from:
currUser}).then( function(txnHash) {
me.setState({txnId : “Transaction Id : “ + txnHash});
});
} catch (err) {
console.error(“Err voting “+ err);
return;
}
});
}
The last implementation we do is to make the dApp a little more user friendly. You can’t expect an end user to run a block-explorer and check for her transaction status using the transaction hash we throw up. 😊 So let’s fix that.
For this we create a utility method which looks up the status of a transaction given its hash id.
getReceipt = () => { var v = this.refs.txnRefId.value;
web3.eth.getTransactionReceipt(v, function(err, receipt){
var txnMsg = "Status : ";
if(receipt.status === "0x1") { //success
txnMsg = "Sucess </br>";
} if(receipt.status === "0x0") { //failure
txnMsg = "Failure </br>";
}
if(!receipt.status) { //unknown
txnMsg = "Unknown Failure </br>";
}

txnMsg += "Block Id : " + receipt.blockHash + "</br>";
txnMsg += "Total gas used : " + receipt.cumulativeGasUsed; me.setState({resultMsg: txnMsg});

});}
The method getTransactionReceipt provided by eth returns an object called ‘receipt’ which contains all the information about a transaction as it was mined. The receipt contains many fields but ‘status’ is the most important which indicates if the transaction was successful. Where 1 = success and 0 = failure. Even if the transaction failed at contract layer it will be mined.
If the transaction is not mined at the time of calling this method the receipt will be null.
Any blockchain transaction takes time to be mined (ranging from minutes, to hours and more). So a user would be required to check on the status of her transaction after some time. A production dApp can implement this as a push message from the app once it is able to retrieve a receipt or any alternate approach that makes it simpler for the end user.
The complete code for the app and contracts is available from github here.
That’s all Folks!!!
Hope you had fun going through all the parts. Do let me know your views! (Contact Us)