Navigating Ethereum — Part 1

January 25, 2021 -
Get on the chain
Part 2 and Part 3 published now
If you are like me and trying to navigate through the swarm of buzzwords, technologies and frameworks while trying to understand Ethereum and setup a dev environment, then hop along, as I take you through a guided tour of this adventure.
Throughout this multipart article we will
- Set up an Ethereum private blockchain.
- Write smart contracts and deploy it on the blockchain
- Create a basic web app using reactJS and web3 to interact with the contract(s).
Note: Remember this is not a quick ‘Hello World’ from IDE, but a full fledged environment where you have full control without interacting with any external systems — not even Ethereum test networks. The default instructions are for Mac. For other environments you would need to lookup tool specific installation instructions from respective sites.
We will be using Solidity as the programming language to write our smart contracts.
Lets see what a developer normally does:
- Writes code using an IDE
- Compiles that code using language specific compiler
- Deploys the binaries on a server
- Builds an user interface app to interact with those backend services
To name those entities while working with Ethereum you have:
- Remix — which is browser-based Solidity compiler and IDE (this is available over the internet or as local installation). You can use any text based editor but Remix makes life a little easier. (VS Code also has great plugins for solidity)
- solc — Solidity compiler
- Ethereum Virtual Machine (EVM) with Blockchain for execution of binaries
- Truffle javascript framework for deployment and management of smart contracts
- web3.js the javascript library that enables json rpc to interact with your solidity code from front end apps (The web app can be built using any standard JS framework/library like React, Angular, Vue, etc)
There is an additional tool called blockchain explorer which you can use. We will look at it later in the article.
There are simple and much faster ways of trying out solidity using just the Remix IDE and using a browser based Javascript VM but it doesn’t give you clear picture of all components involved. So we will be going the whole yard in setting up the environment so we know where to look when things don’t work.
Let’s get going:
First we get Geth (go-ethereum). Run these to install Geth:
> brew tap ethereum/ethereum> brew install ethereum
For other environments you can refer their installation instructions here
Alternative to this is a simulator like Ganache (testRPC), which is very useful to test your code once you understand the Ethereum universe. Next to install, Solidity compiler solc run following from a console.
> brew tap ethereum/ethereum // ⇐ not required if tapped already> brew install solidity
To ensure this is working fine open a terminal and try to lookup its version
> solc --version
The last thing to install, for now, is a block explorer for our blockchain. Clone the git repo from here https://github.com/etherparty/explorer using
> git clone https://github.com/etherparty/explorer
We will get back to this and start it once the rest of environment is up and running.
Remember we had said we won’t even connect to an Ethereum testnet. So the first thing we need to do is start our private blockchain. This private blockchain is just an instance of the regular Ethereum blockchain software. But we do not want to sync up all that production or test network data so we start it with a different id and params which does not sync with other networks. Though it generates a lot of Ether and data it’s all fake and cannot be used anywhere. But the code you write here can always be deployed on any Ethereum blockchain if you want. Let’s start with the setup:
We create a dir where all subsequent installations and downloads can be added. Let’s call this ‘mychain’. The ‘data’ dir we will use for blockchain db.
> mkdir -p ~/mychain/data
We need to create the initial account for this chain which would belong to the miner of this node.
> geth --datadir ~/mychain/data account newYour new account is locked with a password. Please give a password. Do not forget this password.
Passphrase: <your passphrase>
Repeat passphrase: <your passphrase>
Address: {f54ae20321259de93786fbc4b4d15f3e444e7c79}// <= you will get a different value
Provide a passphrase here. and and account will be created for you. Remember that the passphrase will be required in future for all transactions. So either write it down or keep it simple for this test environment. (do not use simple passwords for production).
Note: If you don’t use the datadir option the user keys will be generated at ~/Library/Ethereum/keystore (on Mac) and you will need to copy it manually from there to the ‘keystore’ directory of your chain data.
Create few more accounts using same command. To view the list of accounts just created use:
> geth --datadir ~/mychain/data account list
An ethereum account address is hex encoded keccak256 hash of last 20 bytes of the ECDSA public key of the account.
Now we need to create a genesis file ‘genesis.json’ or anything you like to call it. Paste the below code into it. Use the ids of accounts you generated above:
{“config”: {
“chainId”: 15,
“homesteadBlock”: 0,
“eip150Block”: 0,
“eip155Block”: 0,
“eip158Block”: 0,
“byzantiumBlock”: 0
},“difficulty”: “0x1000”,
“gasLimit”: “0x2100000”,
“timestamp”: “0x00”,
“nonce” : “0x00”,
“coinbase”: “0x0000000000000000000000000000000000000000”,
“alloc”: {
“<ADDRESS_ID_1>”: { “balance”: “0x5000000000000000000000” },
“<ADDRESS_UD_2>”: { “balance”: “0x5000000000000000000000” }
}
}
This file defines the 0-th block, the first block of this blockchain, the only one which does not have a parent block. We use just some of the parameters required to get our blockchain running.
Let’s look at them briefly:
- config: configuration of this blockchain
- chaindId: A numeric value used to identify this chain. Used for replay protection. (especially between ETH and ETC)
- homesteadBlock: Block Id of Ethereum’s second version HomeStead
- difficulty: Mining difficulty. We keep this low for easier block generation
- gasLimit: A value equal to the current limit of gas that can be used for a block. Or sum of gas of all transactions for a block.
- timestamp: The unix timestamp this block was created at
- nonce: The nonce of this transaction. One of the values to prove PoV for this block.
- coinbase: The miner account which was credited for this transaction
- alloc: preallocation of funds to the miner/etherbase/coinbase account. Ideal for dev/test environments.
Note: There are many other fields in the genesis file spec, and many of the above are not mandatory, but these work just fine and you need not add all to get a basic setup running. There is a good explanation of these here
To initialize an ethereum node using the genesis file we created above. Run the below command from a console:
> geth --datadir “~/mychain/data” init /path/to/genesis.json
This initializes our blockchain using the genesis file storing data at the path we provided. Now let’s get a geth node running using the chain configs we used above. For that the easiest way is to create a .sh file. Create a file
start-chain.sh as below
geth --identity “node1” --rpc --rpccorsdomain “*” --rpcaddr “0.0.0.0” --rpcport “9090” --datadir “~/mychain/data” --port “30303” --nodiscover --networkid 15
Lets understand the parameters we specified:
— identity: This is the name of our node. You can have multiple nodes connecting to this chain. Helps when you are running multiple nodes from same machine
— rpc: enable HTTP-RPC. Default this is enabled
— rpcaddr: This parameter will enable accessing this geth node over HTTP RPC running from remote machines.
— rpcport: The port for rpc. Default is 8545 but I recommend using something different so there is absolutely no confusion when you are connecting to this node.
— datadir: the path to the dir you created at the beginning to store all data. The dir will be created if it doesn’t exist
Warning: If you plan to connect to live ethereum nodes in future be very careful not to mix data dirs of both those nodes.
— port: The P2P port used by nodes to communicate with each other
— nodiscover: Makes this node undiscoverable by other nodes automatically. You can still pair manually
— networkid: This is an important one which identifies this chain. It can be any arbitrary numeric value barring 1–4 which are already taken by the production/test ethereum chains. For now this should be same as chainId defined in ‘genesis.json’.
The default value for — rpcaddr is “localhost” which is secure and does not allow any other node from any network to directly connect with your node. Much more details of rpc is available here
Save the .sh file and make it executable:
> chmod +x /path/to/start-chain.sh
The above node is not a miner, i.e. it will not process any transactions if you send to it. There is a reason we have not done that. Since we have set the mining difficulty quite low in the genesis file, our node will mine hundreds and thousands of useless blocks if we start a miner. Though we will need a few ethers to test our code, but we will do that only when we need.
Once you start a geth node using above script, towards the end of the logs on console you would see a line like below:
IPC endpoint opened: </path/to/your/datadir/geth.ipc>
Now open another console and use below command to connect to this node using the above IPC (Inter Process Communication) endpoint
> geth attach <IPC Endpoint URI>
Running a miner is straightforward. Just run below script from this new miner console after it is connected to the geth node.
> miner.start()
> null
The earlier console where you had started geth will start updating its output indicating mining process. In a few minutes you would have additional easy money in your miner account. Check the balance of an account from the console
> web3.fromWei(eth.getBalance(“<account_id>”))
The address should be your miner’s address or whichever address you want to check balance of.
Let’s stop the miner for now.
> miner.stop()
Next we transfer a few ethers from the miner to other address that we had created earlier.
> eth.sendTransaction({from:eth.coinbase, to:”<another_address>”, value: web3.toWei(100, “ether”)});
Change the ‘to’ address to one of the non-miner addresses. We are transferring 100 ETH here. You can change the value as required. You should get an error as below:
> Error: authentication needed: password or unlock
This is because the miner account from which you are trying to transfer the funds is locked. Type ‘personal.listWallets’ in the console and it will show you that all the accounts have a status like ‘Locked’.
…..
……
accounts: [{…}],
status: “Locked”,
url: “keystore: …”
}, {
…..
This is so that someone cannot just call an api and pass the account id to perform a transaction. We will need to unlock this before doing the transfer using following command:
> personal.unlockAccount(<account_id>’);
This will prompt for the password for this account and unlock it till the console is open.
NOTE: You should never do this in production. This is just to demonstrate the APIs and understand what happens around a transaction.
Now first start the miner and when we run the same command to transfer some ether we get back a hash which is a transaction id. Go ahead and check the balances of both the accounts.
We now start the block explorer which will show us the status of the transaction and all the blocks on our blockchain. Make sure you have node.js and npm installed before this. Open a console and navigate to the cloned directory of the block explorer we downloaded earlier and run
> npm start
Open a browser and go to http://localhost:8000
The first time you startup you would get an error on the browser like below

This is because the explorer default listens to the geth node on 8545 but we have started it on 9090. So we will need to change that. Go to the the root directory of your block explorer code and open app/app.js file in a text editor and change the port for the url as shown below to correct value:
var eth_node_url = “http://localhost:9090”;
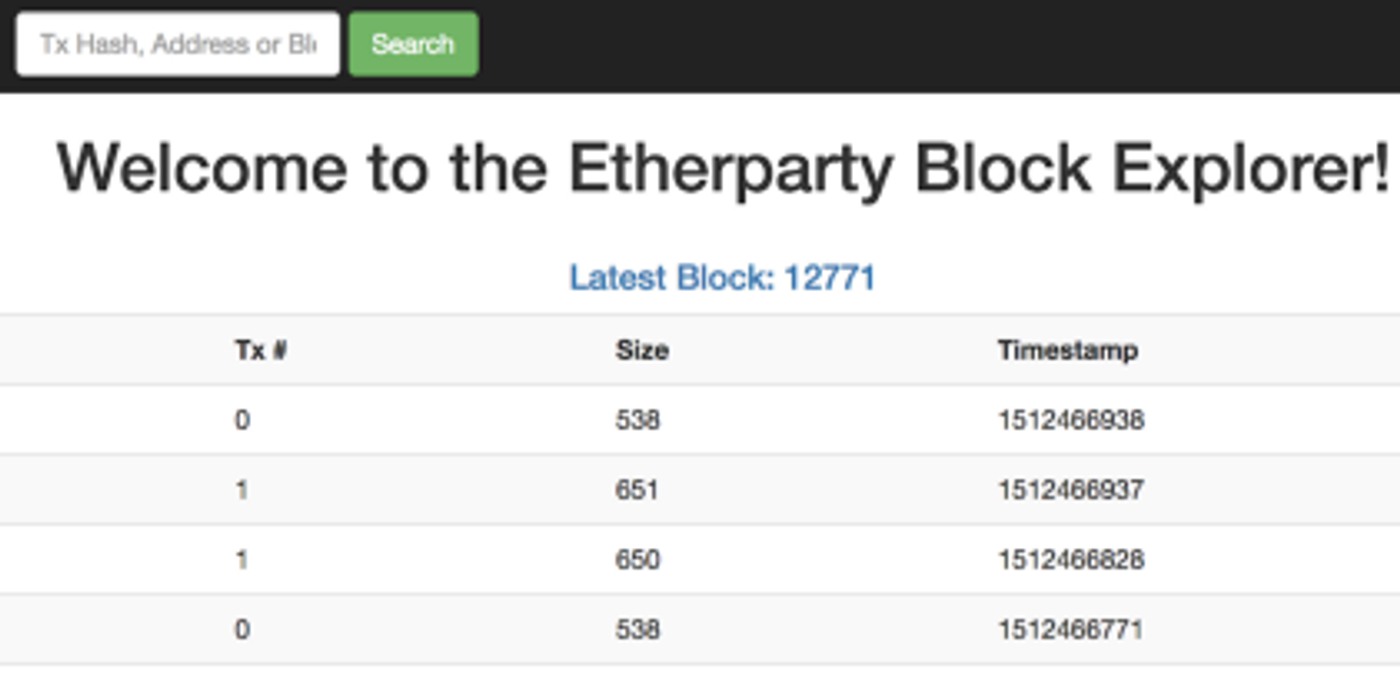
Now when you restart the app and refresh the browser you should see a listing like below.

Try pasting any one of the account ids or our transaction id in that text box above and search. It shows you its balance or details in case of a transaction. You can put any transaction id, account id, block id and have a look at its details. We will use it to check our transaction status.
Congrats!! If you made it this far. We are all done with setting up our blockchain. In the next parts we will develop some smart contracts and deploy it onto our blockchain.
Hope you had an exciting time setting up a private ethereum chain. Do let me know if you enjoyed it. Or even if you faced any problems following the steps.