Navigating Ethereum — Part 2


January 25, 2021 -
Writing down the smarts. Smart Contract development
In Part 1 we were able to setup a private Ethereum blockchain and do some basic stuff like creating accounts and transferring some Ether from one account to another using its CLI.
We now get started with writing a smart contract which we will execute from our browser based IDE. To write solidity contracts we will use Remix IDE. We can do it two ways. Just use it from here https://remix.ethereum.org OR you can download and run offline from your own machine. For this go to https://github.com/ethereum/remix-ideand follow the installation instructions. The main difference is that the web version is always up-to-date with latest features and solc compiler versions.
You can think of smart contracts just like regular ‘class’ objects that you would write in any other programming languages to implement your business logic. The change in behavior or restrictions is not due to solidity — well not completely — but more so because of (EVM) Ethereum Virtual Machine. We will go through a bit more once we are done with a basic piece of code.
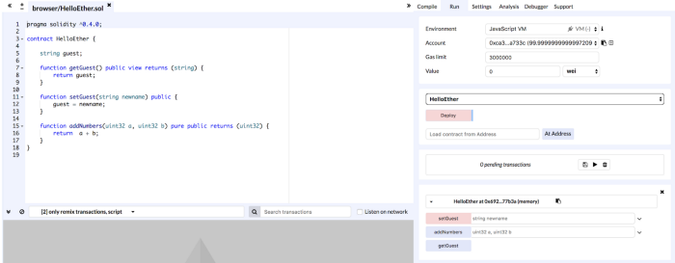
Once you have started the IDE, go ahead and delete the sample voting.solfile from the IDE Then create a new file by clicking on the small ‘+’ sign at the left most corner. Name this file HelloEther.sol. This is a smart contract which can be executed directly from the IDE. Copy the below code and paste it to the new file. We are not doing anything complicated here as its visible. More details later.
pragma solidity ^0.4.0;contract HelloEther {string guest;function getGuest() public view returns (string) {
return guest;
}function setGuest(string newname) public {
guest = newname;
}function addNumbers(uint32 a, uint32 b) pure public returns (uint32) {
return a + b;
}}
Let’s run our code and see what happens:
- Select the tab ‘Run’ on right side of IDE
- For ‘Environment’ select ‘Javascript VM’
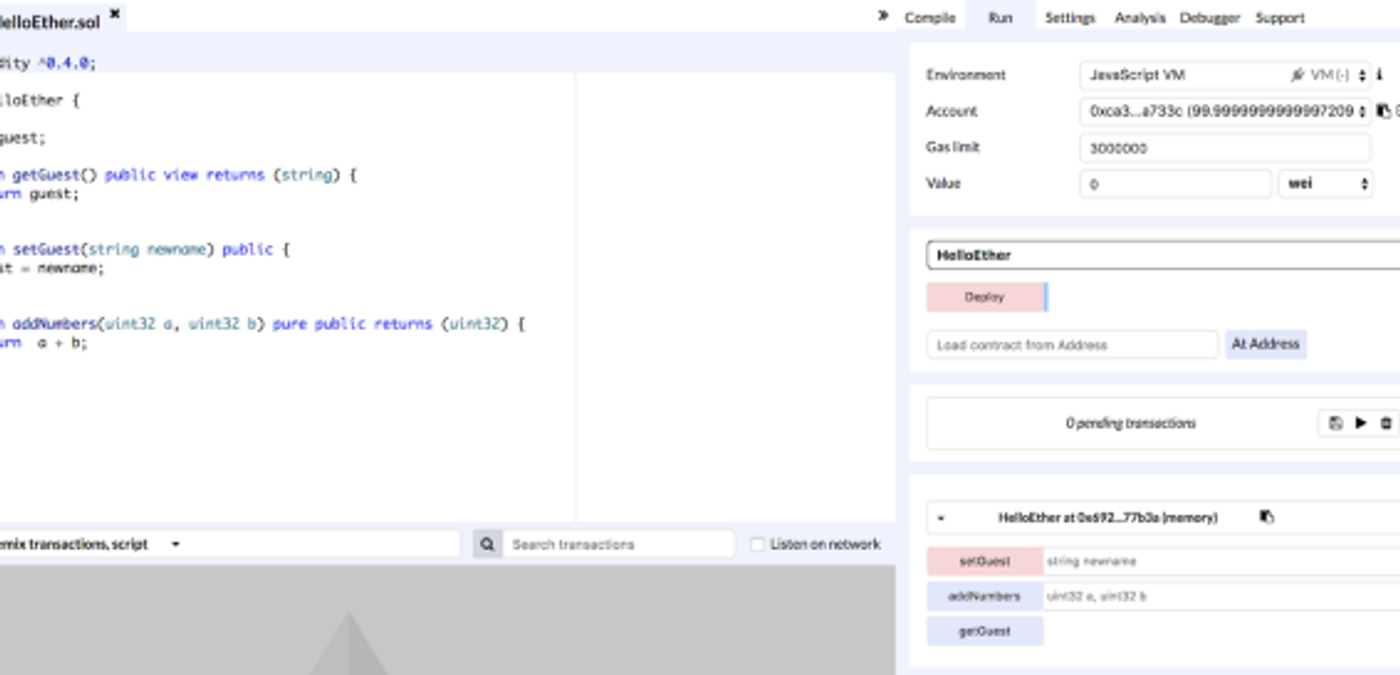
- Make sure your file name ‘HelloEther’ is showing in the dropdown then click on the ‘Deploy’ button. The window should look like below
- You can see that it has generated buttons for each method in the contract.
- Enter a value “test” (or anything you like with double quotes) for setGuest method and invoke the method by clicking on that button.
- The console below the code will show an output. Click on the hyperlink “[vm]” in that console and it will show up details of the transaction. It shows stuff like gas used, transaction cost along with the data sent.
Clicking on the ‘debug’ link on the right side of transaction confirmation will debug that same transaction and you can step through the statements while looking at the variables too. Great stuff from ethereum guys!!
Solidity is a like a statically typed Javascript with specific features for EVM. Its highly recommended to read the docs carefully.
Ok now let’s write a contract that does more than just prints names. The next piece of code is a simple voting system. The features available are:
- Contract owner creates and adds options to a ballot.
- A voter votes for the options
- User can view scores of options
- User can check the status of her submitted transaction.
The first piece of code we create, lets call it BallotData.sol will store — well data for ballot. And then add a data struct called Option which users will select while voting.
The code should look something like below:
pragma solidity ^0.4.0;
/**
* Contract represents a simple data model for storing ballot data.
* A voting contract can use this to define its ballot model
*/contract BallotData { // data structs
struct Option {
uint32 id;
string value;
uint32 score;
}
}
The first line ‘pragma’ tells the compiler that we would like our code to be compiled using a version not lesser than and not greater than the mentioned major version, in our case 0.4.0. The caret ‘^’ sign indicates “greater than”. Any version 0.4.xx would be compatible but something like 0.5.0 will not be.
The struct keyword defines a data structure like any other language. We have defined three attributes for our Option. Id, a name and total number of votes for this Option.
Next we create a map structure using an id mapped to the Option struct, to store all the options available as part of this ballot. We also have a counter variable that we will use as a kind of id generator for each new option added. Since values in maps can only be accessed by key and there is no list/enumeration of keys available, this will also help us get all keys of this mapping.
mapping(uint32 => Option) internal options;
uint32 public optionsCount = 0;
For the options mapping you can see it is marked ‘internal’. This means that this variable cannot be accessed from outside i.e. other contracts or apps. Its available only to this contract and its subcontracts (subclasses). But the variable optionsCount is marked public.
Solidity generates a read method for all public variables in your contract. We will see this later when we deploy the contract in Remix and write our client app also. The default access for all variables is ‘public’.
Why wouldn’t we use just a simple array instead of a mapping for the options list? Well because arrays in solidity are not like your ordinary arrays. Accessing an element at an empty index just returns default values of that object — which makes it difficult to determine if there is actually a value at that index or not. For other finer details you can refer the docs.
A mapping works using key-value pair pretty much like any language. You can also have nested mappings if you want like so:
mapping(uint32 => mapping(uint32 => Option)) nestedOptions;
Next we create two functions to add a new Option and get details of an Option by a given id.
function addOption(string _value) public returns (uint32 _optionId) {
options[optionsCount] = Option({id : optionsCount, value: _value, score : 0});
optionsCount++;
return optionsCount-1;
}function getOptionAt(uint32 _id) public view returns (string, uint32) {
return (options[_id].value, options[_id].score);
}
A few concepts which we can see here are that return values can be named in the function definition but its not mandatory. You can return multiple values from a function as shown in getOptionAt. The rest of the code is self-explanatory.
And that completes the data store. The full contract should look like this:
pragma solidity ^0.4.0;/**
* Contract represents a simple data model for storing ballot data.
* Avoting contract can use this to define its ballot model
*/contract BallotData {
// data stucts
struct Option {
uint32 id;
uint32 score;
string value;
} //list of options
mapping(uint32 => Option) internal options ; //total count of options available
uint32 public optionsCount = 0;function addOption(string _value) public returns (uint32 _optionId) {
options[optionsCount] = Option({id : optionsCount, value: _value, score : 0});
optionsCount++;
return optionsCount;
}/**
* Returns name and total score of an Option by given option id
*/
function getOptionAt(uint32 _id) public view returns (string, uint32) {
return (options[_id].value, options[_id].score);
}}
Go ahead, deploy and execute methods from the IDE like we did earlier.
To complete the voting APIs we create another contract that extends this and captures the votes from different users. We call it Voting.sol and since it’s going to use the BallotData features it extends from it. Also because its much cheaper to call a parent class method than a method from a different contract.
pragma solidity ^0.4.0;import ‘./BallotData.sol’;contract Voting is BallotData { /**
* Stores the address of voter against the option selected
*/
mapping (address => uint32) private votes;}
First we import the parent contract and then mark the child contract as ‘is’ BallotData indicating it extends that contract. The mapping stores a special data type called ‘address’ mapped to the option id. An address is the account id of a user on ethereum network. To perform any activity a user needs an “account id” which we generated in our previous tutorial using “ geth — datadir ~/mychain/data account new”
In the real world, these accounts will be generated using public wallet apps/sites like myetherwallet.com or MetaMask.
Now you might think isn’t it a bad idea to store who voted for which option? Yes! I agree but there are two reasons we have it here. First is an important concept to remember that an address is anonymous i.e. there is no way to identify the actual person who owns that account id so it is not very helpful even if we store the account ids and voted options.
One of the design principles you need to keep in mind writing contracts is that account ids are free and any person can have multiples of them. You cannot restrict a person performing some operation based on account id.
And the second point being, we are going to use this method to demonstrate access control on the data on blockchain.
The main function of this contract just allows a user to select one option and vote for it
function vote(uint32 _optId) public {
//increment the score of the option being voted
options[_optId].score++;
// store the user id against the option voted
votes[msg.sender] = _optId;
}
Notice how we do not need to pass the voter address explicitly but is available as part of the global variables. We get implicit object of ‘msg’ which represents the transaction message. Attribute ‘sender’ — the user address which invoked this method and ‘value’ — any Ether sent as part of this transaction call, are some of the attributes of ‘msg’ that you can refer to. There are few other global variables which you can refer here.
function getVoteFor(address _voter) public view ownerOnly returns (uint32) {
return votes[_voter];
}
The code above returns the id of the Option selected by the given account id. Let us look at some of the new keywords in this function definition. The keyword ‘view’ indicates that this is a read-only operation and it does not alter the state of data. The other is ‘ownerOnly’ — this is the data access control feature that was mentioned above. Lets see how this works.
We need to add some more code to make sense of this:
address private owner;constructor() public {
owner = msg.sender;
}modifier ownerOnly {
//can use this too
// assert(msg.sender == owner);
if(msg.sender != owner) {
revert(“Operation not permitted”);
}
_;
}
A new private variable called ‘owner’ is declared which would contain the address of the user who created/deployed this contract on blockchain.
We define a special function called ‘constructor’ which is called when the contract is initialized on the blockchain — which happens only once in its lifetime. Here we take the transaction sender’s address and update the ‘owner’ variable. We then create a ‘modifier’ which checks if the address calling the function, in our case ‘getVoteFor’, is the owner of this contract.
A modifier is a reusable piece of code which gets executed before the body of a function if it is mentioned as part of function definition. The underscore in the modifier represents the function body. You can create your own modifiers and a method can have any number of them. It works pretty much like AOP (Aspect Oriented Programming) in other programming languages.
You can use ‘assert’ to ensure that a condition is met but the end user does not get any response message in that case and only gets a failure. So a ‘revert’ is more user friendly. Using ‘assert’ for business validations is not recommended because it consumes all the gas sent for a transaction. But ‘revert’ is a more gentle option which sends back the remaining gas for a transaction. There are subtle differences between ‘assert’, ‘require’ and‘revert’ but they are beyond the scope of this article.
You can now deploy and test this contract too. Since this one extends the BallotData you only need to deploy ‘Voting.sol’.
We covered some core concepts and approach to coding smart contracts using solidity with Remix IDE. This is a convenient approach as you can quickly code, deploy, debug your contract and once all is working as expected take it to the web app for deployment and building a UI application using these contracts. Which is what we will do in our next installment.
That concludes this part. Hope you enjoyed going through this or if you had any problems understanding or running the code do let me know.